I-FAX
E-Mail to Fax Usage Guide
Subscribers to the IMPACT Fax system that have registered to send Faxes via E-Mail can send an E-Mail to Impact Fax that will then be converted and transmitted as a Fax to a selected fax number. The E-Mail must come from an E-Mail address that has already been registered with Impact Fax.
HOW TO
Enter the Fax Number:
To send a Fax via E-mail, the sender must address the E-Mail to a specially formatted E-mail address. The E-Mail address should be the Fax Number followed by "@sendEfax.com". All 10 digits of the fax number must be supplied and only 10 digits are accepted.
Example: 3145551212@sendEfax.com
Hyphens are permitted in the Fax number for clarity if desired.
Example: 314-555-1212@sendEfax.com
NOTE: You may NOT put any "." (dot/period) in any part of the Fax number.
The special Fax E-Mail address can be in either the TO: field or the CC: field of the E-Mail. You can include as many Fax E-Mail addresses on one E-Mail as you like. So, you can effectively create a Fax broadcast by sending out a single E-Mail to multiple Fax E-Mail addresses.
System Auto-Generated Cover Sheet:
You can have the Impact Fax system automatically generate a Fax Cover Sheet for you. You do this by supplying a Fax Recipient name as part of the E-Mail address. You enter the name to the left of the phone number with a "." (dot/period) separator between the name and number. The recipient name can be anything that is part of a valid E-Mail address. NOTE: There cannot be any spaces in the E-Mail address.
Examples:
Bill.Martin.2125551212@sendEfax.com
Bill-Martin.2125551212@sendEfax.com
Bill_Martin.2125551212@sendEfax.com
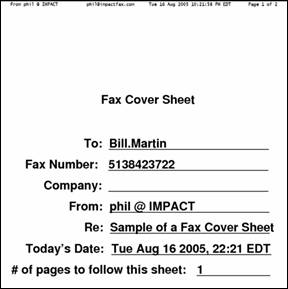
If you include a Recipient name in the E-Mail address, a fax cover sheet will be automatically generated for the fax. The subject line of the E-Mail will become the Subject line on the coversheet. Your name, as listed in the original E-Mail, will be placed on the cover sheet. Your company name, as listed in IMPACT's billing system, will be placed on the cover sheet. This is a sample of a system generated cover sheet. The "From:" line is taken from your return E-Mail address and the Subject line is taken from the subject of the E-Mail.
If the E-Mail you send includes a message in the body of the E-Mail, this message will become the next page of the fax following the System Auto-Generated Fax Cover Sheet.
User Generated Cover Sheet:
If you did not include a Recipient name in the E-Mail address (as described above), then the message body of the E-Mail will become the first page/Cover Sheet of the Fax. If the E-Mail you send includes ANY message or text in the body of the E-Mail, this will become the Cover Sheet of the fax. If the E-Mail body contains any text at all, including any kind of E-Mail signature, a fax page will be generated from this message body.
If you have heavily formatted text in the body of the email, embedded images/pictures/artwork or text boxes in the message body, you should take the following steps to ensure that the cover sheet will be fax as you expected.
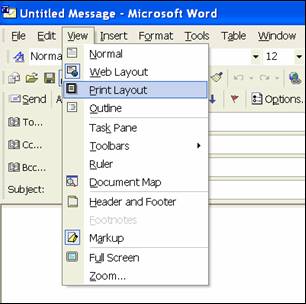
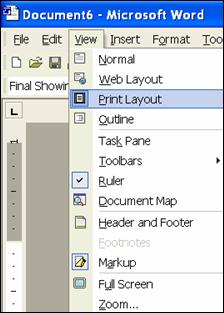
If you are using Microsoft Outlook with Word as your email editor (this is the typical situation), while you are editing the email select View from the top menu and then click on Print Layout from the drop down menu (as shown in this following screen shot).
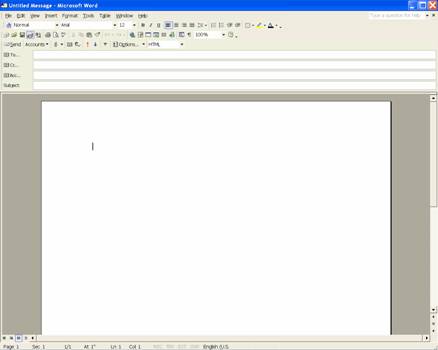
After you have changed to the Print Layout, your screen will look similar to the picture below. This view will show you exactly how your document is going to layout when it is Faxed.
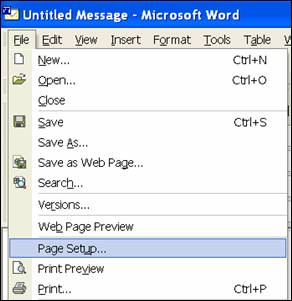
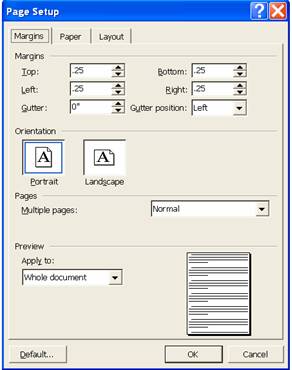
Next, you should consider changing the page margins for the document to enable you to use the amount of space on the page that you desire. As an example, you might choose to have 1/4 inch margins all around the page. To do this, while you are editing the email select File from the top menu. Then click on Page Setup from the drop down menu as shown below in the screen shot.
You will get the Page Setup dialog box now. Change the Margins to '.25' in Top, Bottom, Left and Right fields. Then click on OK.
Documents to Fax:
Any attached files to the E-Mail will be converted into fax pages and added to the fax. Any Microsoft Word, Excel, PowerPoint, PDF, Tiff, HTM, BMP, GIF, html, postscript or text file that is attached to the E-Mail will be processed and added to the fax transmission after any coversheets.
|
|
|
|
|
|
|
|
|
|
|
|
|
|
|
|
|
|
|
|
|
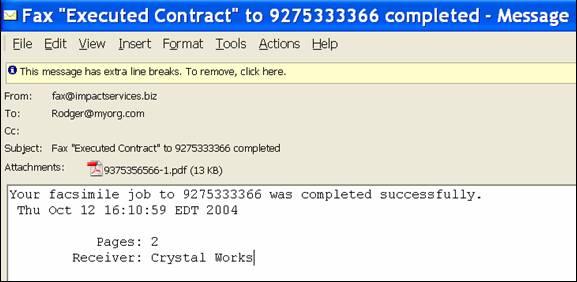
Completed Fax Notification:
When the fax is completed, a notification E-Mail will be sent as a confirmation to the sender of the fax with an attached copy of the fax included as a PDF file. If your original Email included a Subject line, then the return Fax Notification will all include that Subject line as part of the notification. This will help you keep your notification filed correctly or help you recognize which Fax has completed if you have recently sent several faxes. The notification Email will look similar to this.
EXAMPLES:
Here is a sample of what an E-Mail to Fax transmission may look like using Microsoft Outlook. However, you can use any E-Mail program and the essential parts are still the same.
Sending Faxes from Microsoft Word
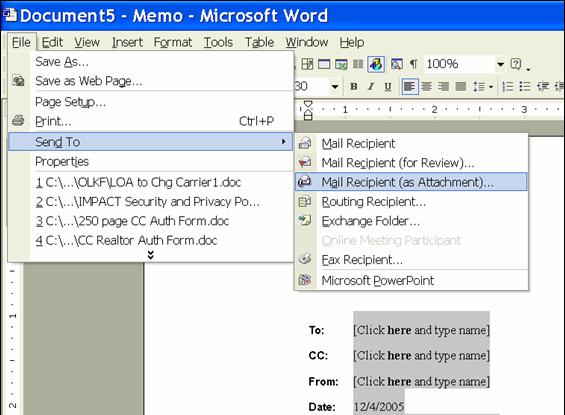
You can send a Microsoft Word document as a fax. While you are in the Word document, select File, then Send To, then Mail Recipient (as Attachment). If you use Outlook as your Email program, this should attach the Word file to an email. See the screen shot below.
Sending Faxes From Office 2007
Office 2007 file formats are supported by I-FAX fax sending systems. However, documents with macros in them are not supported by the fax sending system. You must first remove these macros from your documents before submitting them to the I-FAX fax sending sytem for transmission.
If you choose, you can also change your Office program to save documents in the 2003 format for backward compability.
Follow these steps to set and change the default saving file format in Office
2007 programs.
To change default file save options in Office Excel 2007
- Click the Microsoft Office Button
, and then click Word Options.
- Click Save.
- Under Save documents, next to Save files in this format, select Excel 97- Excel 2003 Workbook.xls .
To change default file save options in Office PowerPoint 2007
- Click the Microsoft Office Button
- Click Save.
- Under Save documents, next to Save files in this format, select PowerPoint 97-2003 Presentation (*.ppt).
To change default file save options in Office Word 2007
- Click the Microsoft Office Button
- Click Save.
- Under Save documents, next to Save files in this format, select Word 2003-97 Document (*.doc).
Recommendations for use
Do not include background/wallpaper on your E-Mail body. This will cause an extra page to be transmitted that is just a copy of the background or it may cause your text on top of the background/wallpaper to be unreadable with faxed. Also, avoid pasting color graphics and images into the body of the E-Mail. These pasted graphics will not fax well to black and white fax machines. Note that graphics and images that are inside of Word, PDF or other attached files will be faxed but will be converted to black and white by the receiving fax machine.
Avoid using colored fonts in the body of the E-Mail and in documents to be faxed. Colors generally do not fax well and can give unexpected results with some colors appearing very pale or faded when a fax is transmitted. Faxing is best done with black letters on while background to provide an optimum contrast for reading the document at the receiving fax machine.
Avoid grayscale images. While grayscale may appear ok on the computer screen, the resolution of faxes is much too low to support quality output on the receiving end of this type of document. Also, grayscale documents will have a much lower contrast between the letters and the background. This can cause faxed documents to be very difficult to read.
If you scan documents and then Fax them, you should set your scanner to scan at a resolution of 200 dots per inch (dpi). This will help produce a better document to be Faxed. See this link for more tips on faxing scanned documents http://www.scantips.com/basics05.html
Create and send documents in Portrait mode on the page (long side up and down).
If your documents cannot be converted for faxing, try sending the documents with your email program set to 'Plain Text' format (versus HTML or Rich Text)
Troubleshooting?
You will get an E-Mail notification of a problem if you do one of the following:
Submit a fax from an unregistered E-Mail address
Submits a fax for a phone number that is more or less than 10 digits
Submits a fax for an unsupported or unknown attachment type
Submits a fax with no attachments and no text in the E-Mail message (no pages to fax)
Submit a fax with attachments that are password protected
Using a custom cover page when sending a fax
The easiest way to do this is to have an MS Word document created which will serve as a form cover page. (Remember that graphics and lots of colors do not fax well.) With this form you can type in any special comment you want to send to the recipient.
For the best results and to ensure that the Faxed document format as you expect it to, you should change your Word View to be Print Layout. You can do this by selecting the View menu option from the top menu and then selecting Print Layout from the drop down menu as shown in the following screen shot.
When you are ready to fax the document, with the cover page form open on your screen click on File then Send To then Mail Recipient as shown below (do not select 'for Review' or 'as Attachment')

If you are using Outlook as your email program, this should open your email application with the cover page in the body of the email. Enter the fax number you wish to send the fax to and then attach any other files/documents you wish to follow the cover page. The I-Fax server will send the cover page first followed by whatever file you attach is sent with the email.
Again, remember graphics and colors do not fax well!